 There are two main ways to make an image go to the right. Both of them are described further below.
First method – Change the image tag.
To get the image to go right (and look good) you have to make your image tag look like this…
<img src="image.jpg" style="float:right; margin: 5px;" />
That is it! You are done. (methods are described in detail below)
Second Method – Using CSS.
To make an image align right using CSS we need to have code for the CSS file and the HTML code for the page…
CSS code:
img.floatright {

    float: right;

    margin: 5px;

}
HTML code:
<img src="images/yourimagefile.jpg" class="floatright" />
That’s it! You are done. (methods are described in detail below)
Techniques described
if you weren’t sure what to do…
Here is a more detailed description of the above methods. We will explain everything.
First Method – Changing the image tag
An image tag is how images are displayed on web pages. They often look like this…
<img src="image.jpg" />
This code is telling your web page to display an image and telling it where the image is.
It isn’t telling it the many other things an image can be told to do. To change the way your image is displayed means we have to add to this code.
Above we added style to the image. We told it to float right and we told it to have a margin of 5 pixels.
We changed it to look like this…
<img src="image.jpg" style="float:right; margin: 5px;" />
If you are really interested, here is what each part of the image tag is doing…
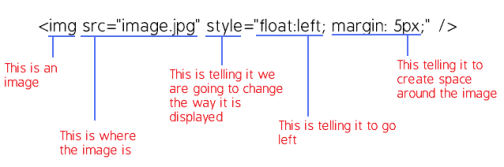
This method simply adds the style elements to the image tag that are required for it to display to the right and have some space around it. If you want more space around the image you can change the “5″ to “10″ and that will put more space between your image and your text.
Second method – Using CSS.
A CSS file contain instructions that your web pages use to display items in certain ways. In order to use CSS techniques, we must change the CSS file and the HTML document.
First you must update your CSS file and add the following code…
img.floatleft {

    float: right;

    margin: 5px;

}
This is creating a “class”. It is an instruction of how to display your image whenever that class is called. The name of this particular class is “floatleft”, but we can call it whatever we want. The name of the class is whatever is to the right of the “.” in the code above. If we wanted to call this class “gumballs” we could and it would look like this…
img.gumballs {

    float: right;

    margin: 5px;

}
In any case, let’s just call it “floatright” since that is what we are doing.
Once you have added this to your CSS file, you must tell the image what instructions to use. To do this, go to the image tag of the image you want to display right and change it so that it knows what instructions to follow…
<img src="images/yourimagefile.jpg" class="floatright" />
In the above code you can see that we added a “class” and that it’s name is “floatright”. Now the image knows where to find instructions.
Once the CSS file and the HTML image tag is updated, the image will appear to the right of the text.