Here is an image tag that contains a minimum amount of information...
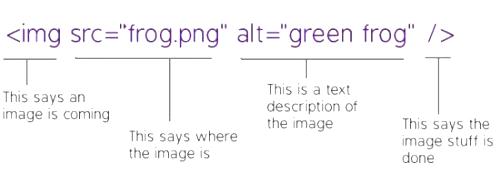
The way an image shows up on your web page is defined by what information the image tag has in it.
Required Image Tag Attributes

The image tag is always opened with a "<img"
This simply tells the web page that you are talking about an image.
The vast majority of images on the web start with these four humble characters. Example use:
<img src="frog.jpg" alt="green frog" />
Next we have "src="
This tells the webpage where the image is (src stands for source). This can be a full URL like "https://imagecss.com/frog.png" or it can be relative like "frog.png". The idea is simply to point the code to where the image location is. Example use:
<img src="frog.jpg" alt="green frog" />
The next bit is "alt="
This is a required part of the image tag as far as the HTML folks are concerned. It is a text description of what the image is. If the image is a frog, you can put alt="frog". If the image is a green frog wearing a hat, then you could put alt="green frog with hat". This element is very important to use, and to use correctly. It is how blind people will "see" your image. It also is how search engines will know what that image is too. The goal is to briefly describe your image accurately and descriptively. Example use:
<img src="frog.jpg" alt="green frog" />

An image tag always ends with a "/>"
This tells the web page that this is the end of the image information.
It is important to remember to put a space between the last information of your image tag and the end statement. Example use:
<img src="frog.jpg" alt="green frog" />
Recommended Image Tag Attributes
The items described above are the most basic elements of an image tag, but there are more. Many of these next image tag attributes are considered necessary to have.
width= defines the width of an image.
The width attribute tells how wide an image is. By defining a width (and height), you help your webpages load much faster. The Google webmaster guidelines suggest that you define width and height for every image you use. Width is most commonly defined by pixels as in - width="30" - which states that the image is 30 pixels wide. Width can also be defined as a percentage as in - width="50%" - which states that the image width should be 50 percent of the element it is contained in. Using pixels to define images is recommended because in most cases the actual size of the image should be defined. Example use:
<img src="frog.jpg" alt="green frog" width="200" height="200" />
height= defines the height of an image.
The height attribute tells how tall an image is. By defining a height (and width), you help your webpages load much faster. The Google webmaster guidelines suggest that you define width and height for every image you use. Height is most commonly defined by pixels as in - height="30" - which states that the image is 30 pixels tall. Height can also be defined as a percentage as in - height="50%" - which states that the image height should be 50 percent of the element it is contained in. Using pixels to define images is recommended because in most cases the actual size of the image should be defined. Example use:
<img src="frog.jpg" alt="green frog" width="200" height="200" />
title= defines the visible title of an image.
The title attribute defines what a user will see in most browsers when mousing over the image. It is, however defined as an attribute that provides "additional information" about an image. In general it should be a brief and accurate description of the image, but it can also be used as visual cue that is different from the image description found in the alt text. Image our example image "frog.jpg", it has alt text of "green frog". Our title text can also be "green frog" but a better title might be "frog jumping" (or whatever the frog is doing in the image). Example use:
<img src="frog.jpg" alt="green frog" width="200" height="200" title="frog jumping" />